Scanning Network by IP Address Range
![]() Very often, especially if your network does not have
properly configured DNS and WINS servers, it can be difficult to view the network neighborhood tree. The scan network by IP addresses
function allows retrieving the list of all available hosts in this case.
Very often, especially if your network does not have
properly configured DNS and WINS servers, it can be difficult to view the network neighborhood tree. The scan network by IP addresses
function allows retrieving the list of all available hosts in this case.
You can use the IP address range scanning for detection hosts with a certain service running (when some TCP port is opened). For example, you can find all FTP servers on your network by setting the Port field to 21 (the same for HTTP - 80).
Note: This function is the firewall dependent. You should configure your firewall so the program could scan TCP ports on other hosts.
![]() The IP address scanning function (in the menu Edit | Import hosts | Scan IP address range) duplicates the Search New Hosts function which is described in details here.
The IP address scanning function (in the menu Edit | Import hosts | Scan IP address range) duplicates the Search New Hosts function which is described in details here.
The IP address scanning function is built upon the same routine as used in the Network Map Creation Wizard. It is based upon the multi-threaded polling of all possible IP addresses within specified address ranges. The program sends a set of the standard network queries to each IP address, and replies to these requests indicate that devices with those IP addresses exist on the network. Such polling queries include:
- Sending an ICMP packet (ping).
- Scanning the list of TCP ports.
- Trying to get a host's MAC address (ARP ping).
- Connecting to the SNMP agent.
The polling routine runs through a number of simultaneous threads, which speeds up the search.
![]() For searching for new devices on the network, select Service | Search New Hosts or Edit | Import hosts | Scan IP address range....on the main menu. The host searching window contains several tabs.
For searching for new devices on the network, select Service | Search New Hosts or Edit | Import hosts | Scan IP address range....on the main menu. The host searching window contains several tabs.
Enter the network IP address scanning ranges in the Starting IP address and Ending IP address fields on the first tab. When you click on the down arrow button, the starting address field value will be copied to the ending address field speeding up entering of IP range values. By default, these fields will automatically have the IP range of your computer's IP address (calculated automatically using the network mask value). You can specify a different IP address range automatically by selecting a different network interface from the corresponding drop-down list. Add the range you have defined to the list of IP ranges to be scanned by clicking the Add -> button. To remove a range from the list, simply click on the Delete button. Please note that the program will only process ranges you have selected by checkboxes.
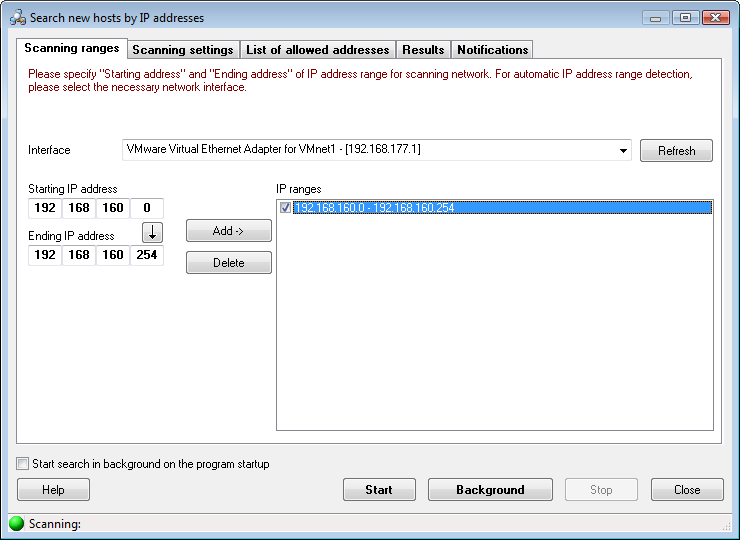
Fig. 1: The IP range scanning window (configuring IP address ranges).
![]() On the second tab (Fig. 2), you can set the scanning parameters. Select required network polling methods. Keep in mind that the more methods you select, the more devices can be found. However, that will increase the scanning time. The same applies to the number of TCP ports to be scanned and the number of ICMP Packets to be sent (more packets or ports -> more time on scanning). The data in the Community field is necessary for finding and SNMP devices (network printers, switches, etc.) and retrieving the MAC address and connection port data from it. The most common Community string values are: public, private, rmon.
On the second tab (Fig. 2), you can set the scanning parameters. Select required network polling methods. Keep in mind that the more methods you select, the more devices can be found. However, that will increase the scanning time. The same applies to the number of TCP ports to be scanned and the number of ICMP Packets to be sent (more packets or ports -> more time on scanning). The data in the Community field is necessary for finding and SNMP devices (network printers, switches, etc.) and retrieving the MAC address and connection port data from it. The most common Community string values are: public, private, rmon.
Warning! When you are scanning many TCP ports on remote hosts, this can be considered as a potential hacking attack following the corresponding consequences. If you are not the network administrator, please use the scanning functions carefully on your LAN.
For all types of queries, you can set a custom Response timeout for every address to be polled. If your network connection is slow or you are scanning through the Internet, increase the timeout for better results.
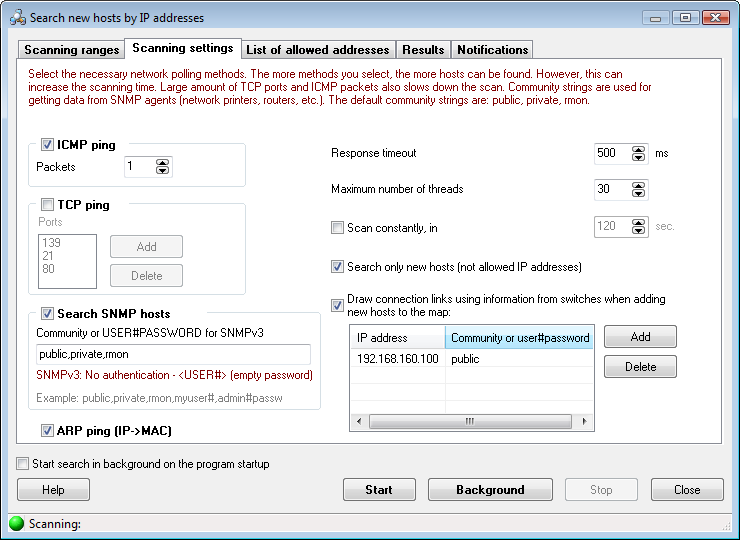
Fig. 2: The IP range scanning window (configuring scanning parameters).
Enabling the Search only new devices parameter allows keeping an eye on new and unauthorized devices attempting to connect to your network. To ensure that the function runs well in this mode, scan the network the first time when this parameter is disabled. After finding all the network devices within the specified address range, add their addresses to the List of allowed addresses (Fig. 3). Then enable the Search only new devices parameter, and the program will notify you when new active devices with addresses not belonging to this list are found (see the Notifications tab). You can loop the scanning process by specifying the automatic scan restart period (the Scan constantly, in ... sec. parameter.) The parameter Maximum number of threads sets the number of search threads that will simultaneously scan the specified IP ranges. The more threads you set, the faster the scanning will go. However, a very big number of threads can significantly drop the overall performance of your system. It is recommended that you use the default values. The biggest allowed number of threads is 100.
If you want the program to draw connection links for new found devices, select the Draw connection links using information from switches when adding new devices to the map option and configure IP addresses of managed switches that can contain this data. If the connection information cannot be retrieved, the lines will not be drawn or updated.
![]() The third tab (Fig. 3) contains the List of allowed IP addresses. It can be compiled both by hand and automatically, by importing the data from an earlier created map or from the search results list (Fig. 4). When the program searches for new hosts, it checks whether the list of allowed addresses contains each newly found host. If the host does not belong to the list, the program will add it to the results tab.
The third tab (Fig. 3) contains the List of allowed IP addresses. It can be compiled both by hand and automatically, by importing the data from an earlier created map or from the search results list (Fig. 4). When the program searches for new hosts, it checks whether the list of allowed addresses contains each newly found host. If the host does not belong to the list, the program will add it to the results tab.
This list also allows the program to find unauthorized computers connected to your network. If someone changes his IP address, the program will also detect this. In order to do this, you need to add all known hosts to the list of allowed addresses. Add IP and MAC addresses of the hosts to the list and select the Search only new devices option on the previous tab. The program will compare found addresses with the allowed addresses. If a new address is detected, the program will show a message. If you want to monitor and find new computers in your network only, you need to specify MAC or IP address for each host. If you want to monitor IP address changes, please specify IP and MAC addresses both.
The list of IP addresses can be saved to a file, or loaded from a file.
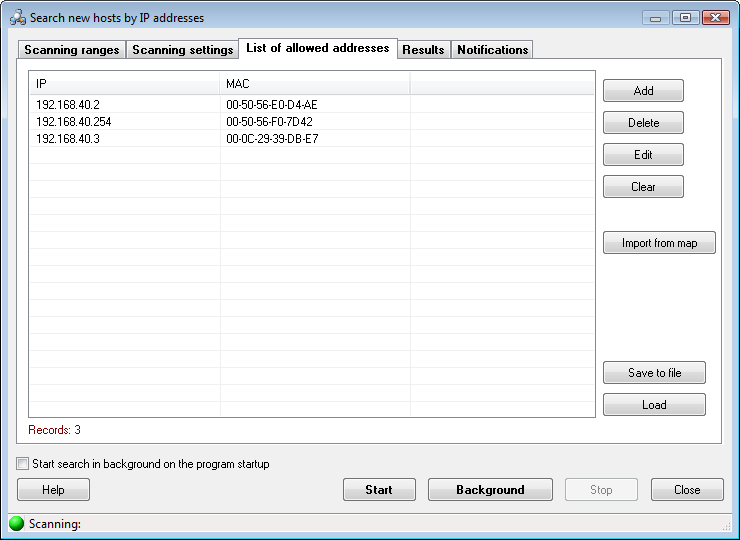
Fig. 3: The IP range scanning window (configuring allowed IP addresses).
![]() Scanning results are displayed on the Results tab (Fig. 4). To place found devices on the map, select them in the list and click the Add to map button. If necessary, you can cut off DNS suffixes of computer names when placing those on the map (select the parameter Cut DNS suffix...). You can also select the Add only new devices option to add only new devices to the map you have created (i.e. only those that are not currently on the map). This makes it easier to maintain the actuality of maps of rapidly growing, large networks. When scanning the network automatically in the background mode, newly detected devices will be placed on map if you select the Place on map automatically setting.
Scanning results are displayed on the Results tab (Fig. 4). To place found devices on the map, select them in the list and click the Add to map button. If necessary, you can cut off DNS suffixes of computer names when placing those on the map (select the parameter Cut DNS suffix...). You can also select the Add only new devices option to add only new devices to the map you have created (i.e. only those that are not currently on the map). This makes it easier to maintain the actuality of maps of rapidly growing, large networks. When scanning the network automatically in the background mode, newly detected devices will be placed on map if you select the Place on map automatically setting.
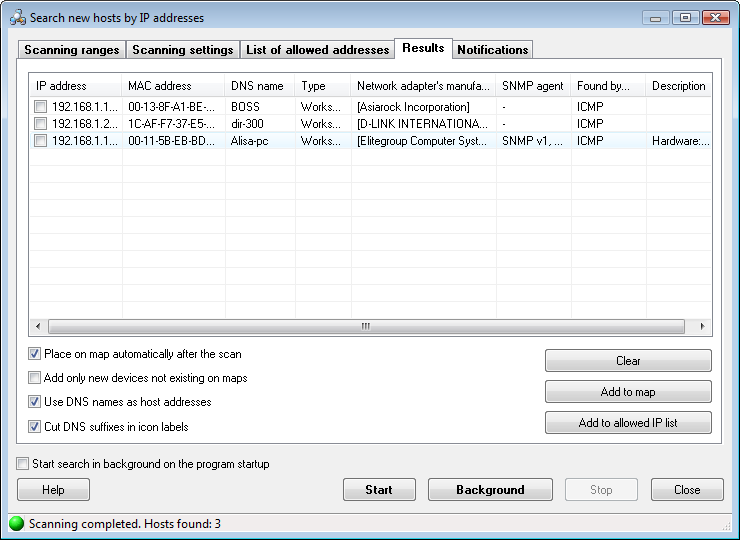
Fig. 4: The IP range scanning window (scanning results).
Select the Use DNS names as host addresses option to resolve IP addresses and use textual DNS addresses instead of the original IP addresses in the host properties' "network address" field (this address will be used for the host access, monitoring, and management). If DHCP is used on your network and the IP addresses are dynamical, we recommend you to enable this option.
The search process can be stopped before the completion by clicking on the Stop button.
The Logic of Adding New Hosts to Map
When the program finds a new host it assigns a network address to the host according to the Use DNS name as host address and Cut DNS suffix before adding to map options. For example, the address will be "192.168.1.1", or "mypcname.dnszone.dom", or "mypcname". After forming the address, the program will search for it among hosts on the current map. If the address is not found, the host will be considered as new and it will be added to the map. Please note that the program will not consider the "mypcname.dnszone.dom" and "mypcname" addresses as equal. I.e., if you used addresses with DNS suffixes when the map was created, but then you selected the Cut DNS suffix before adding to map option when the program is searching for new devices, the hosts will be added to the map one more time (without DNS suffixes on this time) and you will see duplicates.
Detecting New Hosts and Alerting About That
![]() On the Notifications tab, you can configure actions (including alerting) to be taken when the program detects new hosts on your network. This will only be done if the Search only new devices parameter is enabled on the Scanning settings tab. The hosts that are not listed on the List of allowed addresses tab will be considered as new and the program will notify you about them. The notification methods include: displaying a screen message, sending e-mail or SMS, writing to the program log, playing a sound, and running an application. Select necessary options how you would like to be applied.
On the Notifications tab, you can configure actions (including alerting) to be taken when the program detects new hosts on your network. This will only be done if the Search only new devices parameter is enabled on the Scanning settings tab. The hosts that are not listed on the List of allowed addresses tab will be considered as new and the program will notify you about them. The notification methods include: displaying a screen message, sending e-mail or SMS, writing to the program log, playing a sound, and running an application. Select necessary options how you would like to be applied.
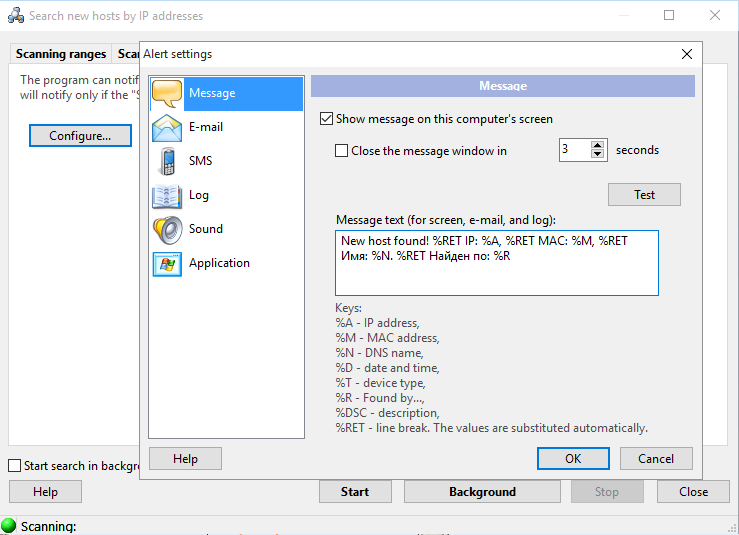
Fig. 5: The IP range scanning window (notifications about new hosts).
The Message text can also be configured on this tab. You can use the substitution Keys that described on the bottom of the window and the program will substitute these keys with corresponding actual values in the message text when it is displayed, sent, or written to a log.
![]() To hide the scanning process to background, hit on the Esc key or click on the Background button. After that, the toolbar of the main window of the program will display the button with the scanning progress displayed in its caption. Clicking on that button will bring the scanning wizard window back to the screen. If you activate the Background mode and then minimize the program to the system tray and the scanning is complete or a new device is found, you will be notified with a sound, a message, and a bubble tip near by the program icon in the system tray.
To hide the scanning process to background, hit on the Esc key or click on the Background button. After that, the toolbar of the main window of the program will display the button with the scanning progress displayed in its caption. Clicking on that button will bring the scanning wizard window back to the screen. If you activate the Background mode and then minimize the program to the system tray and the scanning is complete or a new device is found, you will be notified with a sound, a message, and a bubble tip near by the program icon in the system tray.
![]() To keep an eye on the security of your network constantly and automatically, select the parameter Start search in background on the program startup. In this case, the specified IP ranges will be scanned automatically every time the program is started. The scanning window will be minimized in this case. You will need to either select the corresponding items on the main menu or click on the button on the toolbar described above to restore the scanning window.
To keep an eye on the security of your network constantly and automatically, select the parameter Start search in background on the program startup. In this case, the specified IP ranges will be scanned automatically every time the program is started. The scanning window will be minimized in this case. You will need to either select the corresponding items on the main menu or click on the button on the toolbar described above to restore the scanning window.
![]() You can copy scanning results to the clipboard and then paste it to any text file or a Microsoft Excel worksheet. For that purpose, open the context menu over the result list and then select the Copy to clipboard item.
You can copy scanning results to the clipboard and then paste it to any text file or a Microsoft Excel worksheet. For that purpose, open the context menu over the result list and then select the Copy to clipboard item.