Network Map Creation Wizard
![]() This wizard will help you create new network maps and automatically draw connection lines that imitate network cables on the map. The wizard uses 2 methods for searching network devices:
This wizard will help you create new network maps and automatically draw connection lines that imitate network cables on the map. The wizard uses 2 methods for searching network devices:
1) Scanning IP address range
This method allows you to spot the maximum number of devices. It features the following advantages:
- High scanning speed (~16 addresses/sec. with optimal* scanning settings - see below)
- Recognition of diverse device types: printers (local and network), switches, hubs, servers, database servers, routers, WiFi access points, etc.
- Combination of several efficient network equipment searching methods (ICMP ping, scanning series of TCP ports, sending ARP requests).
- Retrieving data from the equipment via SNMP (switches, printers, WiFi, etc.)
- Automatically building network map by drafting over data received from switches .
- Automatic retrieving of the additional information from found hosts (IP and MAC addresses, NIC manufacturer, DNS name, OS type, connected printers, descriptions.)
- Scanning several IP ranges at once.
- When found devices are placed on the map, they are automatically scheduled for specific automatic checks.
If you have a big distributed network, we recommend you to use this scanning method.
2) Importing from Network Neighborhood
This method works somewhat faster than the other one; however, not all devices are guaranteed to be found. Moreover, using this method the program will not be able to build the network map automatically. However, it will automatically place found computers to groups, depending on workgroups and domains the computers belong to.
Searching for CCTV IP cameras using ONVIF
Using this function, you can detect all video surveillance IP cameras and DVR/NVR available on the local network that support the ONVIF (Open Network Video Interface Forum) technology and the WS-Discovery protocol. The program allows you to get basic information about cameras: model, manufacturer, serial number, firmware version and an RTSP link, which can be used to receive a video stream in third-party applications and in the program's CCTV monitoring checks. Click the upper link to learn more about the ONVIF camera scanner configuration.
![]() Importing from Network Neighborhood does not involve difficulties.
Importing from Network Neighborhood does not involve difficulties.
![]() What we are to learn in detail is scanning the IP address range.
What we are to learn in detail is scanning the IP address range.
 Step 1
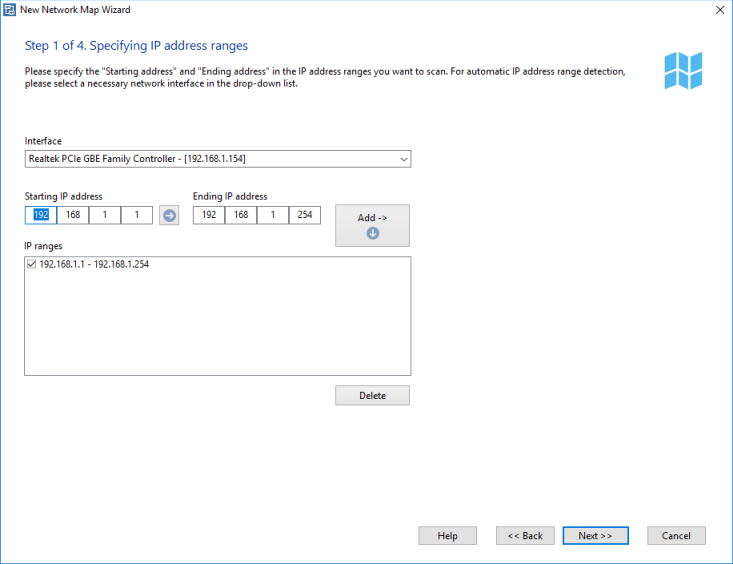
![]() On the first step (Fig. 1), specify an IP address range to be scanned. Enter the network IP address scanning ranges in the Starting IP address and Ending IP address fields. When you click on the right arrow button, the starting address field value will be copied to the ending address field speeding up entering of IP range values. By default, these fields will automatically have the IP range of your computer's IP address (calculated automatically using the network mask value). You can specify a different IP address range automatically by selecting a different network interface from the corresponding drop-down list.
On the first step (Fig. 1), specify an IP address range to be scanned. Enter the network IP address scanning ranges in the Starting IP address and Ending IP address fields. When you click on the right arrow button, the starting address field value will be copied to the ending address field speeding up entering of IP range values. By default, these fields will automatically have the IP range of your computer's IP address (calculated automatically using the network mask value). You can specify a different IP address range automatically by selecting a different network interface from the corresponding drop-down list.
Add the range you have defined to the list of IP ranges to be scanned by clicking the Add -> button. To remove a range from the list, simply click on the Delete button. Please note that the program will only process ranges you have selected by checkboxes.
Step 2
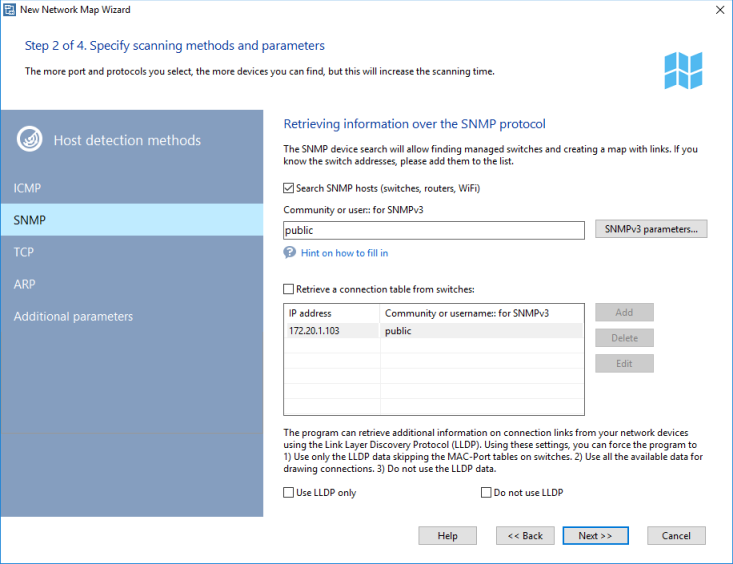
![]() On the second step, we select the scanning methods and specify the parameters (Fig. 2). The program uses several methods for finding devices connected to your network:
On the second step, we select the scanning methods and specify the parameters (Fig. 2). The program uses several methods for finding devices connected to your network:
- Sending ICMP ping requests
- Scanning TCP ports (learn more about the system limitations on scanning remote TCP ports)
- Sending ARP requests
- NetBIOS scanning
- UPnP scanning
- SNMP scanning (including LLDP)
![]() For ICMP ping, you can specify the number of Packets to be sent. To scan opened TCP ports, select the TCP ping option and define the list of TCP port numbers to be checked. The most common open ports in the Microsoft networks are 139 (NetBIOS), 21 (FTP), and 80 (HTTP).
For ICMP ping, you can specify the number of Packets to be sent. To scan opened TCP ports, select the TCP ping option and define the list of TCP port numbers to be checked. The most common open ports in the Microsoft networks are 139 (NetBIOS), 21 (FTP), and 80 (HTTP).
Warning! When you are scanning many TCP ports on remote hosts, this can be considered as a potential hacking attack following the corresponding consequences. If you are not the network administrator, please use the scanning functions carefully on your LAN.
ARP requests are attempts to detect the device's MAC address using its IP address. If the MAC address is obtained successfully, the wizard will add the found IP address to the result list.
![]() For all types of queries, you can set a custom Response timeout for every address to be polled. If your network connection is slow or you are scanning through the Internet, increase the timeout for better results.
For all types of queries, you can set a custom Response timeout for every address to be polled. If your network connection is slow or you are scanning through the Internet, increase the timeout for better results.
![]() The program can Detect network and local printers on your network if your select this option.
The program can Detect network and local printers on your network if your select this option.
![]() The wizard can automatically find database servers on your network, obtain other useful information on found computers (OS type, comment, etc.) To enable retrieving that additional information, select the option Get additional data on hosts via NetBIOS. This function will work only if the NetBIOS protocol is allowed on your computer and on other computers of your network.
The wizard can automatically find database servers on your network, obtain other useful information on found computers (OS type, comment, etc.) To enable retrieving that additional information, select the option Get additional data on hosts via NetBIOS. This function will work only if the NetBIOS protocol is allowed on your computer and on other computers of your network.
![]() To discover IP cameras on the network, use the Search CCTV cameras by RTSP option (cameras must have RTSP enabled).
To discover IP cameras on the network, use the Search CCTV cameras by RTSP option (cameras must have RTSP enabled).
![]() If your network has devices with an active SNMP agent, the wizard will inform you about that and will display the description for those devices. Such active SNMP agents help the wizard to detect more diverse equipment types. Thus, for example, the wizard can identify switches, hubs, routers, printers, WiFi access points, wireless routers, etc. using the obtained via SNMP information. Besides, using such data received from switches, the wizard can automatically draw the connection lines for devices on the map. When searching for network devices with an active SNMP agent, the wizard attempts to connect to the provided addresses using the specified community strings (in the Community field separated with commas). The most commonly used default community strings are public, private, rmon. If your devices have other community strings configured, please specify them in the switch list.
If your network has devices with an active SNMP agent, the wizard will inform you about that and will display the description for those devices. Such active SNMP agents help the wizard to detect more diverse equipment types. Thus, for example, the wizard can identify switches, hubs, routers, printers, WiFi access points, wireless routers, etc. using the obtained via SNMP information. Besides, using such data received from switches, the wizard can automatically draw the connection lines for devices on the map. When searching for network devices with an active SNMP agent, the wizard attempts to connect to the provided addresses using the specified community strings (in the Community field separated with commas). The most commonly used default community strings are public, private, rmon. If your devices have other community strings configured, please specify them in the switch list.
![]() You can scan Virtual LANs and read the MAC address tables from VLANs configured on Cisco switches if you use them. To do this, please specify all VLAN numbers with your community strings using the @ sign in the Community strings field. For example,
public@1, public@2, public@100 (this will poll VLANs 1, 2, and 100). The program will poll all the listed VLANs and get MAC addresses from them to find devices and draw links.
You can scan Virtual LANs and read the MAC address tables from VLANs configured on Cisco switches if you use them. To do this, please specify all VLAN numbers with your community strings using the @ sign in the Community strings field. For example,
public@1, public@2, public@100 (this will poll VLANs 1, 2, and 100). The program will poll all the listed VLANs and get MAC addresses from them to find devices and draw links.
Warning! This function only works on Cisco switches.
 Default checks
When adding the found hosts to the monitoring list, the program can automatically assign them availability and/or performance checks. Select the types of these default checks in the program settings. Performance monitoring requires access to WMI hosts. Set logins and passwords for this, enable WMI availability check.
![]() If you already know IP addresses of your switches and their SNMP community strings, select the Retrieve connection tables from switches option and specify IP addresses of the switches with SNMP. This will raise chances of the successful network map creation containing links between switches and hosts. If this option is turned off, the program will try to detect switches automatically during the scan (if the Search SNMP devices option is checked).
If you already know IP addresses of your switches and their SNMP community strings, select the Retrieve connection tables from switches option and specify IP addresses of the switches with SNMP. This will raise chances of the successful network map creation containing links between switches and hosts. If this option is turned off, the program will try to detect switches automatically during the scan (if the Search SNMP devices option is checked).
Step 3
![]() When all the parameters are set, the wizard launches the scanning process. Hosts found during the scanning will be added to the search results list (Fig. 3).
When all the parameters are set, the wizard launches the scanning process. Hosts found during the scanning will be added to the search results list (Fig. 3).
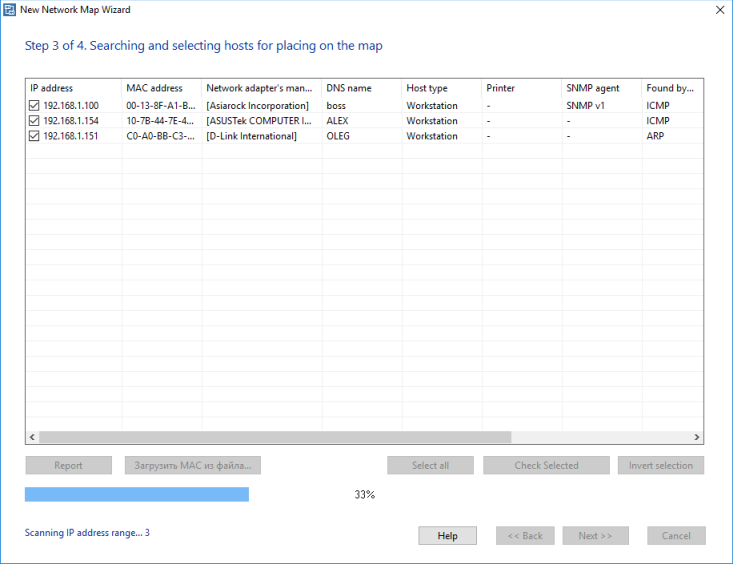
When the scanning is finished, you can modify wrongly detected device types right on this window. To modify the device type, select a record to be modified (multiple host selection is allowed), and then open the context menu using the right mouse button. Select a desired device type on that menu and the device type will be changed for the selected devices.
Select hosts in the list to be placed on your network map. The buttons Select All, Selected, and Invert Selection will help you with the selection of multiple devices.
Click the Report button to export all the scanned information to a CSV file if you plan to work with the data in Excel.
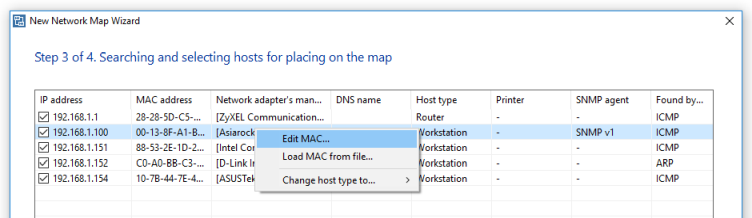
![]() A host's MAC address is the principal parameter for building the network map with connection links between switches, routers, and hosts. Sometimes, the program fails to detect the host's MAC address correctly and gets the MAC address of the nearest switch instead of that (for all hosts behind that switch). In this case, there is the only way to fix this is to specify the correct the wrongly detected MAC addresses manually or to import them from a file (if you have it).
A host's MAC address is the principal parameter for building the network map with connection links between switches, routers, and hosts. Sometimes, the program fails to detect the host's MAC address correctly and gets the MAC address of the nearest switch instead of that (for all hosts behind that switch). In this case, there is the only way to fix this is to specify the correct the wrongly detected MAC addresses manually or to import them from a file (if you have it).

Load the correct MAC addresses from a file or correct them manually one by one.
Step 4
![]() On the final step (Fig. 4), the wizard will prompt you to enter a file name for saving the new map. Before adding the found devices to the map, you can set these advanced addressing parameters:
On the final step (Fig. 4), the wizard will prompt you to enter a file name for saving the new map. Before adding the found devices to the map, you can set these advanced addressing parameters:
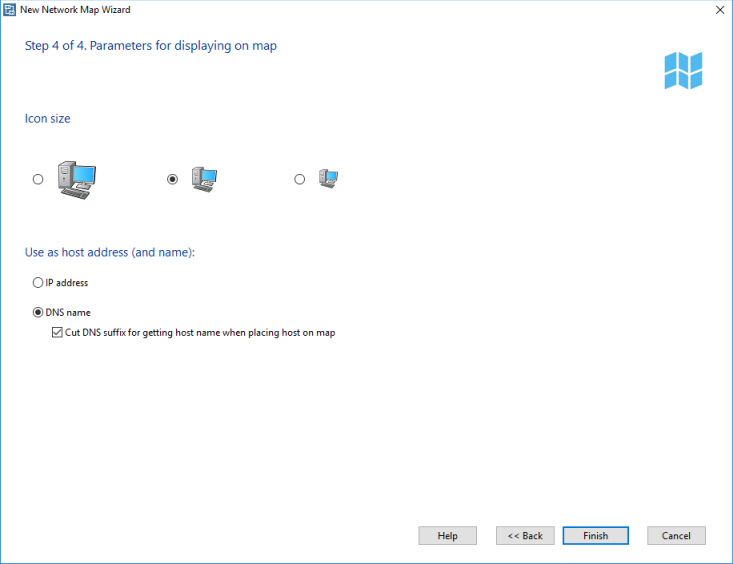
![]() If you enable the Cut DNS suffix for getting host name when placing device on map option, the Scanning Wizard will attempt to use the devices' specific DNS names as labels for their icons. Such names often have the so-called suffix; e.g., mary.dep1.orgname.com. When this option is enabled, the device icon label will appear as mary skipping the common suffix part of the address improving the map look and skipping unnecessary information.
If you enable the Cut DNS suffix for getting host name when placing device on map option, the Scanning Wizard will attempt to use the devices' specific DNS names as labels for their icons. Such names often have the so-called suffix; e.g., mary.dep1.orgname.com. When this option is enabled, the device icon label will appear as mary skipping the common suffix part of the address improving the map look and skipping unnecessary information.
![]() You can specify, what the Wizard should Use as host address: whether it is the device's IP address or its DNS name. For networks with the dynamic IP address allocation (DHCP), we recommend you to select the DNS name option because this attribute will remain constant in this case. For networks with static IP addresses, you can select using the device's IP address as the host address (and name).
You can specify, what the Wizard should Use as host address: whether it is the device's IP address or its DNS name. For networks with the dynamic IP address allocation (DHCP), we recommend you to select the DNS name option because this attribute will remain constant in this case. For networks with static IP addresses, you can select using the device's IP address as the host address (and name).
![]() To add local printers on map, select the corresponding option. However, keep in mind that not all printers found by the Wizard are the actual devices. One local printer can have several names, which the Wizard can interpret as several different printers. So, once the map is generated, you will need to make the adjustment by deleting the redundant duplicating printer icons.
To add local printers on map, select the corresponding option. However, keep in mind that not all printers found by the Wizard are the actual devices. One local printer can have several names, which the Wizard can interpret as several different printers. So, once the map is generated, you will need to make the adjustment by deleting the redundant duplicating printer icons.
![]() When you click Finish, the Wizard will generate and draw the new network map, add all found and selected devices to it, and when it is possible draw the connection lines. It also assigns default object-specific monitoring checks (the ICMP ping check is default but you can change this in the program settings). Then, the map will be automatically saved to the specified file and will be available for further using and modifying. Whenever it is necessary, you can improve the map manually and save the changes to the file.
When you click Finish, the Wizard will generate and draw the new network map, add all found and selected devices to it, and when it is possible draw the connection lines. It also assigns default object-specific monitoring checks (the ICMP ping check is default but you can change this in the program settings). Then, the map will be automatically saved to the specified file and will be available for further using and modifying. Whenever it is necessary, you can improve the map manually and save the changes to the file.
See also:
What to do if connection lines between devices are not drawn?
Searching for IP cameras (and DVR/NVR) with ONVIF
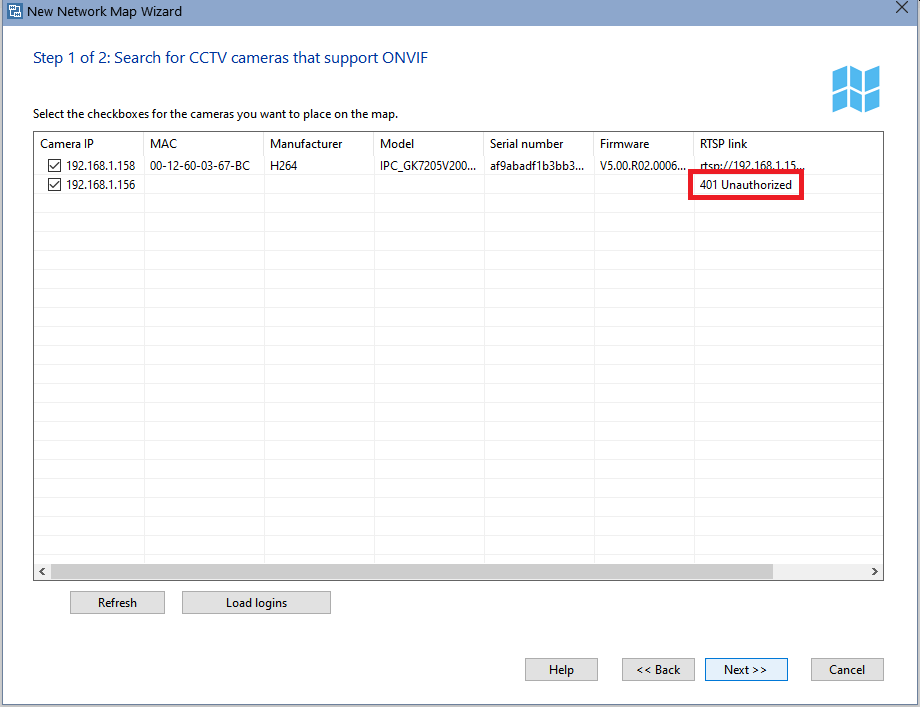
Using this function, you can detect all video surveillance IP cameras and DVR/NVR available on the local network that support the ONVIF (Open Network Video Interface Forum) technology and the WS-Discovery protocol. The program allows you to get the basic information about cameras: model, manufacturer, serial number, firmware version and an RTSP link, which can be used to receive a video stream in third-party applications and in the program's CCTV monitoring checks.
Some cameras require the authorization when connecting to them via ONVIF. To do this, the program two ways for specifying the login and password for each camera: manual and batch loading of the authorization data. Cameras that require authorization report about this using the special message in the RTSP link field: 401 Unauthorized
If there are not many such cameras in the list, you can set a login and password for each of them using the context menu that appears when you click the right mouse button on a camera in the list.
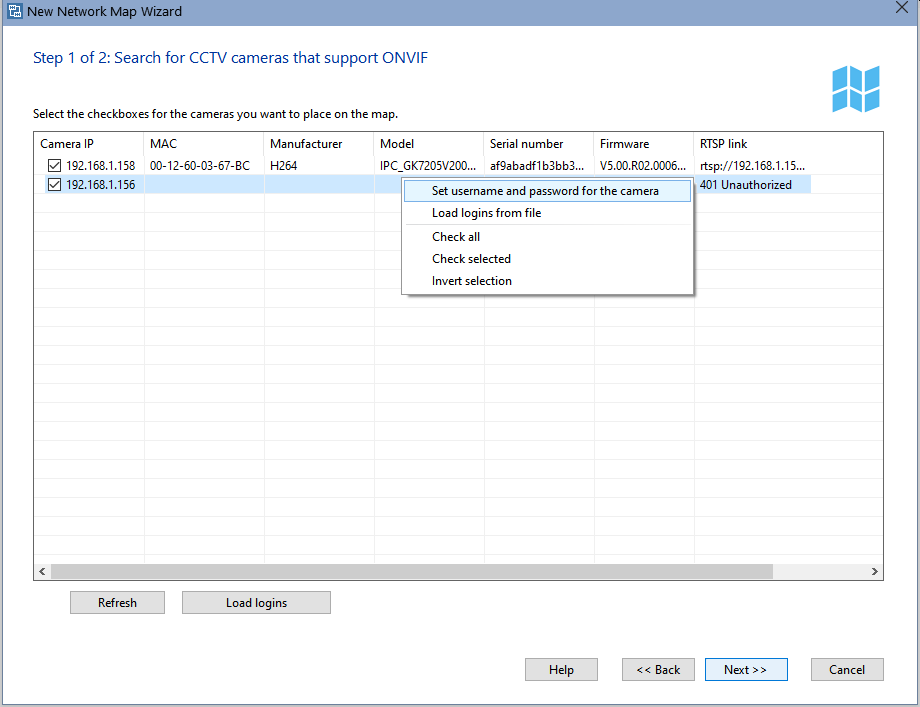
After that, you need to re-scan the network by clicking the Refresh button on the Wizard window.
If most of the found cameras require authorization, you can prepare a text file with logins and passwords and load it into the program. The format of the entries in the file should be:
camera IP address=username:password
File example:
192.168.1.1=user1:password1
192.168.1.2=user2:password2
192.168.1.3=user3:password3
Open this file in the program by clicking the Load logins button. The program will remember the path to this file and it will load data from it automatically on the next time. Remember to update the information in this file if IP addresses of the cameras change.
Cameras with selected checkboxes will be added to the monitoring base and placed on the active map (in the Pro version). You can upload a background image with a scheme of your building or a room and place the camera icons in the desired positions. The camera information received during the scan is recorded in the comment field and displayed in the tooltip of the icon when you poing to it on the network map.
*How to Configure The Best Scanning Settings
The perfect choice of the network scanning parameters depends on your network configuration and availability of necessary protocols. In particular, to detect hosts in the local area network with bandwidth of 100 Mbps and higher, two ping packets with the 100-500 ms response timeout will be sufficient. When you enable the TCP port scanning, the greater number of ports you specify on the list, the longer the application will search for hosts. The best way to go around this issue, is to set 2-3 most commonly used ports so the application could find Windows workstations, servers, and switches; those include the TCP ports 139, 135, 21, and 80 (NetBIOS, DCOM, FTP, HTTP).
Slow NetBIOS Scanning
Searching for network printers is a different story. This procedure takes quite a lot of time, and therefore it should not be run if you are sure that there are no such printers on your network or you are not interested in drawing them on your map and monitoring their state. Otherwise, you would have to wait for the completion of this long procedure which can take several minutes or even hang in some cases if the file sharing is not properly configured on your and other machines. The completion will be indicated by the appearance of the network scanning progress bar on the network scanning wizard window. The reason why the procedure is so slow is because it searches for network printers in a single thread using the old and slow NetBios protocol before launching the primary scanning procedure (which is performed with a large number of threads running simultaneously).
This is also true for obtaining additional information on hosts through NetBIOS. If the NetBIOS protocol is disabled in your network, no such information can be retrieved, and the application will spend a lot of time on the attempt to retrieve this information (hence the feeling that the application is frozen).
Searching for Switches
Searching for network switches is done in the multiple threaded mode. However, if you specify a large number of possible community string values, that will also slow down the scanning process. Hence, if you have set the scanning parameters, and the application is scanning too slow or, even worse, completely "freezes" go ahead and disable some of those unnecessary scanning parameters (firstly, disable the network printer search and disable obtaining additional information using NetBIOS), and try launching the scanning procedure again.