The program allows creating hardware and software reports in several ways:
1. Open the "Reports" main menu and select a report.
2. Click the "Report" button on the summary table window or on the inventory log window.
3. Click the "Print" button on the main toolbar (or select the "File - Print" main menu item) for exporting the currently-displayed data to a report.
4. Select the "Reports - Create Report" main menu item (or select the "Create Report" item in the context menu, or click the "Create Report" button on the main toolbar). This will run the Report Creation Wizard. Read more on working with the Wizard...
After doing this, the program will ask to enter the required data (this depends on the selected report type) and to select computers to be included into the report.
After generating the report, you will see the Report Preview window with buttons on its top toolbar:
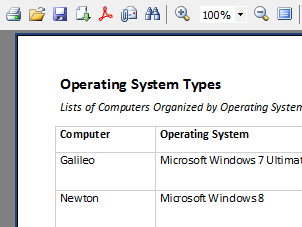
The buttons perform the following functions:
1 - Print the report
2 - Open a saved report (in the .fr3 format)
3 - Save the report (in the .fr3 format)
4 - Export the report to the PDF, XLS, RTF, HTML, CSV, PRN, Open Document, TXT, JPG, GIF, BMP file formats, or send via e-mail
5 - Export the report to the PDF file
6 - Send the report via e-mail
7 - Search for a phrase in the report
8 - Zoom in/out
Warning! The trial version of the program does not allow saving and printing reports. The buttons 1, 3, 4, 5, 6 are disabled.
Please order the program for printing and saving reports without the limitations.