Configuring Context Menu
![]() The program allows you to create your own map context menu. With its help, you can perform various actions and run commands over network devices. This user-defined context menu can also be used through the web interface (in LANState Pro).
The program allows you to create your own map context menu. With its help, you can perform various actions and run commands over network devices. This user-defined context menu can also be used through the web interface (in LANState Pro).
![]() To add a new menu item: click on the network
map area using the right mouse button and then select the Actions | <Add> menu item. This will open the new command configuration window where you can configure:
To add a new menu item: click on the network
map area using the right mouse button and then select the Actions | <Add> menu item. This will open the new command configuration window where you can configure:
- Menu title
- Application
- Command line parameters
- Types of map objects this menu item can be applied to
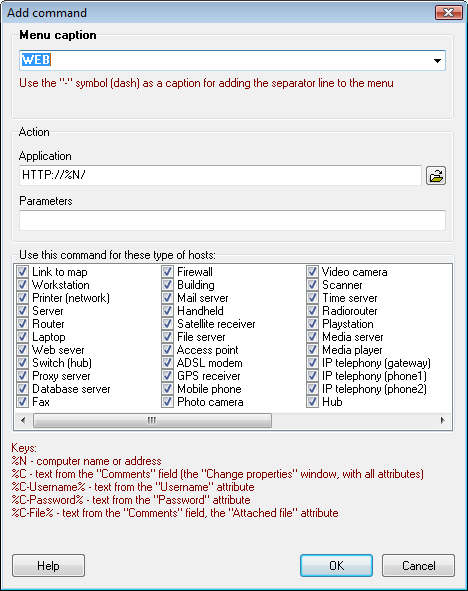
![]() Below the types, you can see a legend explaining the substitution keys.
Below the types, you can see a legend explaining the substitution keys.
Specify the %N key for substituting the selected device's address to the Application or Parameters strings. The program will replace specified keys with the corresponding object's parameters and run the application.
You may use not only paths for executable files in the Application field. You can specify protocols like "http://%N" and other commands you usually can run using the "Run..." item of Windows Start menu.
Specify the %C key for substituting the device's comment field. Thus, you can insert various data (which you can store in the comment field) into the parameter string when running an external application. Specify the %C-Username% and the %C-Password% keys for representing the device's username and password which are stored on the device's properties window. If you want to use the attached file's name from the device's comment properties, use the %C-File% key.
![]() The list of the caption field has a number of predefined
templates (such as HTTP, FTP, etc), which you can use as you wish.
The list of the caption field has a number of predefined
templates (such as HTTP, FTP, etc), which you can use as you wish.
![]() Once you have created a new menu item, it appears
on the selected object's context menu in the section Actions. You can modify, add, or delete menu items.
Once you have created a new menu item, it appears
on the selected object's context menu in the section Actions. You can modify, add, or delete menu items.

![]() You can sort the context menu items by clicking the arrow buttons. If you select the option Perform the first operation from the list on double click on the upper list item will be the default action. It will be applied to map objects by double-clicking on the necessary object (this is faster than bringing up the context menu and selecting an item).
You can sort the context menu items by clicking the arrow buttons. If you select the option Perform the first operation from the list on double click on the upper list item will be the default action. It will be applied to map objects by double-clicking on the necessary object (this is faster than bringing up the context menu and selecting an item).
![]() Use the "-" symbol (dash) as a header for adding the separator line to the menu.
Use the "-" symbol (dash) as a header for adding the separator line to the menu.
Running Applications in Web Browsers Using Web Interface
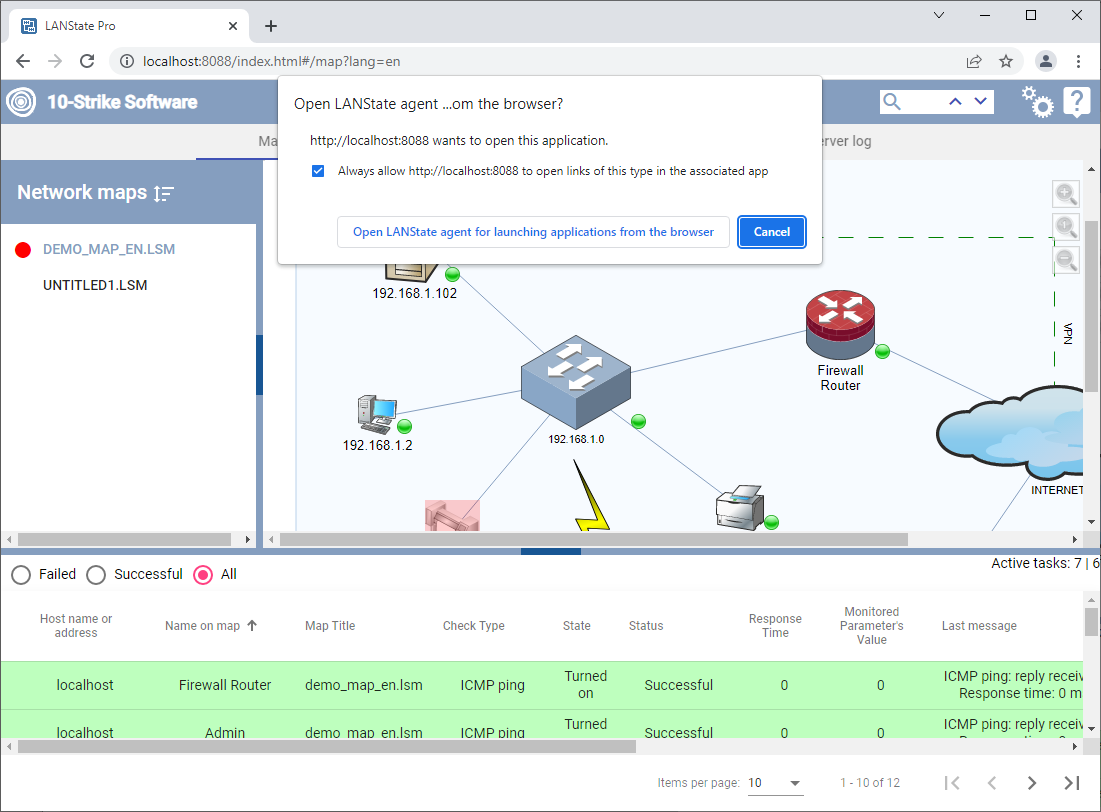
![]() The configured context menu will be also displayed in the program's web interface (in LANState Pro). However, the menu items which start executable .exe files (in the "Application" column) will not work in all modern web browsers by default. The only exception is Microsoft Internet Explorer (up to the version 11).
The configured context menu will be also displayed in the program's web interface (in LANState Pro). However, the menu items which start executable .exe files (in the "Application" column) will not work in all modern web browsers by default. The only exception is Microsoft Internet Explorer (up to the version 11).
![]() You need to configure the following security options in IE settings to run executable files via the web interface's context menu:
You need to configure the following security options in IE settings to run executable files via the web interface's context menu:
1. Click the Tools | Internet Options menu option in IE's main menu (hold Alt to see the menu if it is hidden). Go to the Security tab.
2. Select the Web content security zone to specify its settings Trusted sites. Click Sites.
3. On the Trusted sites window, disable the Require server verification (https:) for all sites in this zone option. In the Add this Web site to the zone field, type the program's web server address (http://network-address-of-a-computer-where-the-program-is-installed. For example, http://server). Click Add. Close the window (OK).
4. In the Security level for this zone field, click the Custom Level... button. On the Security Settings window, find the "Initialize and script ActiveX controls not marked as safe" node in the very beginning of the list and select the Enable option.
5. Apply the settings.
Please note! These security settings are potentially dangerous. If you do not need to run executable files via the context menu in the web interface, do not apply the security settings described above to your Internet Explorer.
In order for menu items with launching applications to work in all other browsers, please install the Agent. It registers its own protocol in the system and launches any applications specified in the web UI's context menu item links. The agent must be installed on systems where you intend to use the host icon's context menus via the web interface. Without the agent application, the menu items that are configured to run external commands and applications will not work.
The agent is included in the distribution package of the program. The installation file is located in the following folder by default: c:\Program Files (x86)\10-Strike LANState Pro\Agent\. You can also download it from our website here: https://www.10-strike.com/lanstate/download.shtml
After the agent installation, you will see a request in the web browser to allow the agent to open links on the first time you call an external command from the user's Actions context menu. Select the Always allow... box and click the Open link button. After that, all your context menu items will work.
Note that some standard Windows commands (for example, telnet.exe) may have executable files in the 64-bit C:\Windows\System32 directory. In this case, they will be inaccessible to the 32-bit Agent app. Try copying the command executable file to another folder and specify the full path to it in the context menu item settings.